5. Replicazione MySQL Master-Master
5.1 Preparazione del Server Master
Effettuare il Login su MySQL e creare un account specifico per la replicazione per evitare problemi di sicurezza per gli altri account (l’username e la password è salvata in plain text).
Eseguire:
mysql -u root -p
CREATE USER 'slaveuser2'@'server2.esempio.com' IDENTIFIED BY 'slave_user_password';

CREATE USER 'slaveuser2'@'192.168.0.2' IDENTIFIED BY 'slave_user_password';

CREATE USER 'slaveuser2'@'2018:f16::2' IDENTIFIED BY 'slave_user_password';
e concedete i privilegi di REPLICATION SLAVE agli utenti appena creati:
GRANT REPLICATION SLAVE ON *.* TO 'slaveuser2'@'server2.esempio.com';
GRANT REPLICATION SLAVE ON *.* TO 'slaveuser2'@'192.168.0.2';
GRANT REPLICATION SLAVE ON *.* TO 'slaveuser2'@'2018:f16::2';
QUIT;
Modifichiamo il file di configurazione MySQL-Config per la replicazione :
nano /etc/mysql/mariadb.conf.d/50-server.cnf
Inserite il codice nella sezione [mysqld]:
NOTA: fate attenzione di inserire il codice nella sezione [mysqld] se inserite il codice alla fine del file la configurazione viene ignorata.
[...]
[mysqld]
server-id                = 1
replicate-same-server-id = 0
auto-increment-increment = 2
auto-increment-offset    = 1
log_bin                  = mysql-bin.log
expire_logs_days         = 10
max_binlog_size          = 100M
binlog_format            = mixed
sync_binlog              = 1
relay-log                = slave-relay.log
relay-log-index          = slave-relay-log.index
slave_skip_errors        = 1007,1008,1022,1050,1062,1146,1396
bind-address             = ::
e riavviare il servizio MySQL:
service mysql restart
Inseriamo gli errori che la replicazione deve ignorare per evitare blocchi per errori che possono essere ignorati:
- 1007 = Impossibile creare il database ‘%s’; il database esiste
- 1008 = Impossibile cancellare il database ‘%s’; il database non esiste
- 1022 = Impossibile scrivere; chiave duplicata nella tabella
- 1050 = La tabella ‘%s’ già esistente
- 1062 = Inserimento duplicato ‘%s’ per la chiave ‘PRIMARY’
- 1146 = La tabella ‘%s’ non esiste
- 1396 = Operazione %s fallita per %s – impossibile creare l’utente
la lista completa degli errori la trovate a questo link: Server Error Codes and Messages
5.2 Preparazione del Server Slave
Modificare il file di configurazione MySQL-Config per la replicazione :
nano /etc/mysql/mariadb.conf.d/50-server.cnf
Inserire il codice nella sezione [mysqld]:
NOTA: fate attenzione di inserire il codice nella sezione [mysqld] se inserite il codice alla fine del file la configurazione viene ignorata.
[...]
[mysqld]
server-id                = 2
log_bin                  = mysql-bin.log
expire_logs_days         = 10
max_binlog_size          = 100M
binlog_format            = mixed
sync_binlog              = 1
slave_skip_errors        = 1007,1008,1022,1050,1062,1146,1396
5.3 Creare un backup dei database sul server Master
Eseguire un backup dei database sul server Master inserendo la password di root di MySQL:
mysqldump -p --all-databases --allow-keywords --master-data --events --single-transaction > /root/mysqldump.sql
Copiare il backup sul server Slave:
scp /root/mysqldump.sql root@192.168.0.2:/root
5.4 Importare il backup sul server Slave
mysql -u root -p < /root/mysqldump.sql
Arrestare il servizio MySQL sul server Slave:
service mysql stop
Copiare i file di default di MySQL dal server Master al server Slave.
Sul server Master eseguire:
scp /etc/mysql/debian.cnf root@192.168.0.2:/etc/mysql/debian.cnf
Avviare il servizio MySQL sul server Slave:
service mysql start
effettuare il login su MySQL per settare il master-server con il comando:
CHANGE MASTER TO MASTER_HOST="server1.esempio.com", MASTER_USER="slaveuser2", MASTER_PASSWORD="slave_user_password";
Avviare lo slave:
START SLAVE;
controllare lo stato dello slave:
SHOW SLAVE STATUS \G
Il risultato dovrebbe essere come questo esempio:
*************************** 1. row ***************************
               Slave_IO_State: Waiting for master to send event
                  Master_Host: server1.esempio.com
                  Master_User: slaveuser2
                  Master_Port: 3306
                Connect_Retry: 60
              Master_Log_File: mysql-bin.000001
          Read_Master_Log_Pos: 109989
               Relay_Log_File: mysqld-relay-bin.000002
                Relay_Log_Pos: 110276
        Relay_Master_Log_File: mysql-bin.000001
             Slave_IO_Running: Yes
            Slave_SQL_Running: Yes
              Replicate_Do_DB:
          Replicate_Ignore_DB:
           Replicate_Do_Table:
       Replicate_Ignore_Table:
      Replicate_Wild_Do_Table:
  Replicate_Wild_Ignore_Table:
                   Last_Errno: 0
                   Last_Error:
                 Skip_Counter: 0
          Exec_Master_Log_Pos: 109989
              Relay_Log_Space: 110574
              Until_Condition: None
               Until_Log_File:
                Until_Log_Pos: 0
           Master_SSL_Allowed: No
           Master_SSL_CA_File:
           Master_SSL_CA_Path:
              Master_SSL_Cert:
            Master_SSL_Cipher:
               Master_SSL_Key:
        Seconds_Behind_Master: 0
Master_SSL_Verify_Server_Cert: No
                Last_IO_Errno: 0
                Last_IO_Error:
               Last_SQL_Errno: 0
               Last_SQL_Error:
  Replicate_Ignore_Server_Ids:
             Master_Server_Id: 1
               Master_SSL_Crl:
           Master_SSL_Crlpath:
                   Using_Gtid: No
                  Gtid_IO_Pos:
Se tutto è corretto le voci “Slave_IO_Running” ed “Slave_SQL_Running” devono dare Yes, mentre se la voce “Seconds Behind Master” non è 0, aspettare fino a che non dia come risultato 0 per evitare che le posizioni master-log ed il log position siano scorrette.
Sul server Master eseguire su MySQL:
SHOW MASTER STATUS \G
*************************** 1. row ***************************
            File: mysql-bin.000001
        Position: 1059
    Binlog_Do_DB:
Binlog_Ignore_DB:
1 row in set (0.00 sec)
per avere le coordinate del Replication Master Binary Log.
Abbiamo adesso un server MySQL con replicazione Master Slave. Il server Master è settato come master ed il server Slave come slave.
5.5 Settare la replicazione MySQL Master-Master
Effettuate il Login su MySQL e creare un account specifico per la replicazione per evitare problemi di sicurezza per gli altri account (l’username e la password è salvata in plain text).
Eseguire:
mysql -u root -p
CREATE USER 'slaveuser1'@'server1.esempio.com' IDENTIFIED BY 'slave_user_password';
CREATE USER 'slaveuser1'@'192.168.0.1' IDENTIFIED BY 'slave_user_password';
CREATE USER 'slaveuser1'@'2018:f16::1' IDENTIFIED BY 'slave_user_password';
e concedete i privilegi di REPLICATION SLAVE agli utenti appena creati:
GRANT REPLICATION SLAVE ON *.* TO 'slaveuser1'@'server1.example.tld';
GRANT REPLICATION SLAVE ON *.* TO 'slaveuser1'@'192.168.0.1';
GRANT REPLICATION SLAVE ON *.* TO 'slaveuser1'@'2018:f16::1';
QUIT;
Modificare il file di configurazione MySQL-Config per la replicazione :
nano /etc/mysql/mariadb.conf.d/50-server.cnf
Inserire il codice nella sezione [mysqld]:
NOTA: fate attenzione di inserire il codice nella sezione [mysqld] se inserite il codice alla fine del file la configurazione viene ignorata.
[...]
[mysqld]
[...]
replicate-same-server-id = 0
auto-increment-increment = 2
auto-increment-offset    = 2
relay-log                = slave-relay.log
relay-log-index          = slave-relay-log.inde
e riavviare il servizio MySQL:
service mysql restart
Effettuare il login in MySQL per avere le coordinate del Master Binary Log:
SHOW MASTER STATUS \G
*************************** 1. row ***************************
            File: mysql-bin.000002
        Position: 326
    Binlog_Do_DB:
Binlog_Ignore_DB:
1 row in set (0.00 sec)
Efffettuare il login su MySQL sul server Master ed impostate il master-server con il comando:
CHANGE MASTER TO MASTER_HOST="server2.esempio.com", MASTER_USER="slaveuser1", MASTER_PASSWORD="slave_user_password", MASTER_LOG_FILE='mysql-bin.000002', MASTER_LOG_POS=326;
Avviare lo slave:
START SLAVE;
e controllare lo stato dello slave:
SHOW SLAVE STATUS \G
Controllare che lo slave sia in esecuzione:
Slave_IO_Running: Yes
Slave_SQL_Running: Yes
Se la replicazione non dovesse funzionare consultate le seguenti fonti:
6. Installare ISPConfig sul Server Slave
La replicazione copre tutti i database. Copiare i file db-configs per PHPMyAdmin e roundcube dal server Master al server Slave.
Sul server Master:
scp /etc/dbconfig-common/phpmyadmin.conf root@192.168.0.2:/etc/dbconfig-common/phpmyadmin.conf
scp /etc/phpmyadmin/config-db.php root@192.168.0.2:/etc/phpmyadmin/config-db.php
scp /etc/dbconfig-common/roundcube.conf root@192.168.0.2:/etc/dbconfig-common/roundcube.conf
scp /etc/roundcube/debian-db.php root@192.168.0.2:/etc/roundcube/debian-db.php
Sul server Slave:
Per installare ISPConfig 3 dall’ultima release, eseguire:
cd /tmp
wget -O ispconfig.tar.gz https://ispconfig.org/downloads/ISPConfig-3.1.13.tar.gz
tar xfz ispconfig.tar.gz
cd ispconfig3*/install/
Per eseguire l’installazione lanciate il comando:
php -q install.php
L’installer configurerà tutti i servizi come Postfix, Dovecot, ecc.
Esempio delle risposte alle varie domande dell’installazione:
--------------------------------------------------------------------------------
 _____ ___________   _____              __ _         ____
|_   _/  ___| ___ \ /  __ \            / _(_)       /__  \
  | | \ `--.| |_/ / | /  \/ ___  _ __ | |_ _  __ _    _/ /
  | |  `--. \  __/  | |    / _ \| '_ \|  _| |/ _` |  |_ |
 _| |_/\__/ / |     | \__/\ (_) | | | | | | | (_| | ___\ \
 \___/\____/\_|      \____/\___/|_| |_|_| |_|\__, | \____/
                                              __/ |
                                             |___/
--------------------------------------------------------------------------------


>> Initial configuration

Operating System: Debian 8.0 (Jessie) or compatible

    Following will be a few questions for primary configuration so be careful.
    Default values are in [brackets] and can be accepted with <ENTER>.
    Tap in "quit" (without the quotes) to stop the installer.


Select language (en,de) [en]: < Premere Invio >

Installation mode (standard,expert) [standard]: expert < expert >

Full qualified hostname (FQDN) of the server, eg server1.domain.tld  [server2.esempio.com]: < Premere Invio >

MySQL server hostname [localhost]: < Premere Invio >

MySQL server port [3306]: < Premere Invio >

MySQL root username [root]: < Premere Invio >

MySQL root password []: < Inserire la password di root per MySQL >

MySQL database to create [dbispconfig]: < dbispconfig2 (il nome deve essere diverso dal db sul Master) >

MySQL charset [utf8]: < Premere Invio >

The next two questions are about the internal ISPConfig database user and password.
It is recommended to accept the defaults which are 'ispconfig' as username and a random password.
If you use a different password, use only numbers and chars for the password.

ISPConfig mysql database username [ispconfig]: < ispconfig2 >

ISPConfig mysql database password [06d434604a3371a706a100f9786aec9b]: < Premere Invio >

Shall this server join an existing ISPConfig multiserver setup (y,n) [n]: < y >

MySQL master server hostname []: < server1.esempio.com >

MySQL master server port []: < Premere Invio >

MySQL master server root username [root]: < Premere Invio >

MySQL master server root password []: < Inserire la password di root MySQL del server Master >

MySQL master server database name [dbispconfig]: < Premere Invio >

Adding ISPConfig server record to database.

Configure Mail (y,n) [y]: < Premere Invio >

Configuring Postgrey
Configuring Postfix
Generating a 4096 bit RSA private key
........................................................................++
....................++
writing new private key to 'smtpd.key'
-----
You are about to be asked to enter information that will be incorporated
into your certificate request.
What you are about to enter is what is called a Distinguished Name or a DN.
There are quite a few fields but you can leave some blank
For some fields there will be a default value,
If you enter '.', the field will be left blank.
-----
Country Name (2 letter code) [AU]: < Inserire le due lettere del codice dello stato ( es. IT ) >
State or Province Name (full name) [Some-State]: < Inserire il nome dello stato >
Locality Name (eg, city) []: < Inserire la città >
Organization Name (eg, company) [Internet Widgits Pty Ltd]: < Inserisci il nome dell'azienda o premere invio >
Organizational Unit Name (eg, section) []: < Premere Invio >
Common Name (e.g. server FQDN or YOUR name) []: < Inserire l'hostname del server , in questo esempio: server2.esempio.com >
Email Address []: < Premere Invio >
Configuring Mailman
Configuring Dovecot
Configuring Spamassassin
Configuring Amavisd
Configuring Getmail
Configuring Jailkit
Configuring Pureftpd
Configure DNS Server (y,n) [y]: < Premere Invio >
Configuring BIND Configure Web Server (y,n) [y]: < Premere Invio >
Configuring Apache Configuring vlogger [WARN] autodetect for OpenVZ failed Force configure OpenVZ (y,n) [n]: < Premere Invio >
Skipping OpenVZ Configure Firewall Server (y,n) [y]: < Premere Invio >
Configuring Ubuntu Firewall
N.B se avete installato Metronome avrete anche questa sezione
Configuring Metronome XMPP Server writing new private key to 'localhost.key' -----
Country Name (2 letter code) [AU]: < Inserire le due lettere del codice dello stato ( es. IT ) >
State or Province Name (full name) [Some-State]: < Inserire il nome dello stato >
Locality Name (eg, city) []: < Inserire la città >
Organization Name (eg, company) [Internet Widgits Pty Ltd]: < Inserisci il nome dell'azienda o premere invio >
Organizational Unit Name (eg, section) []: < Premere Invio >
Common Name (e.g. server FQDN or YOUR name) []: < Inserire l'hostname del server , in questo esempio: server2.esempio.com >
Email Address []: < Premere Invio >
Fine sezione di Metronome
Install ISPConfig Web Interface (y,n) [n]: < Premere Invio >
Configuring DBServer
Installing ISPConfig crontab
Detect IP addresses

Installation completed.
Sul server Master:
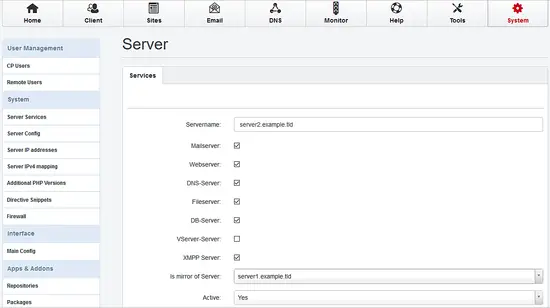
Effettuare il login su ISPConfig sul server Master andare nella sezione Systema / Servizi Server e cliccare su server2.esempio.com e settare Mirror del Server su server1.esempio.com:
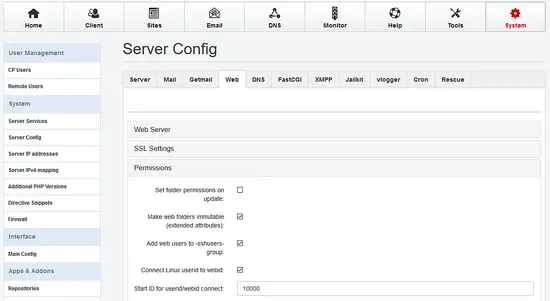
Andare su Server Config, scegliere la scheda Web e settare i permessi per tutti i server:
Se avete gli stessi dati (Siti, E-Mail….) sul server Master, andare nella sezioneStrumenti / Resync ed avviare un resync completo selezionando tutte le voci.
7. Installare Unison
Installeremo Unison per sincronizzare la directory /var/www tra il server Master ed il server Slave.
Installare Unison sul server Master ed il server Slave.
Eseguire:
apt -y install unison
Creare il file di configurazione /root/.unison/web per Unison sul server Master:
mkdir /root/.unison
nano /root/.unison/web.prf
inserire il seguente contenuto:
# Roots of the synchronization
root = /var/www
root = ssh://192.168.0.2//var/www

# Paths to synchronize
#path = www
#path = vmail

# Some regexps specifying names and paths to ignore
#ignore = Path stats    ## ignores /var/www/stats
#ignore = Path stats/*  ## ignores /var/www/stats/*
#ignore = Path */stats  ## ignores /var/www/somedir/stats, but not /var/www/a/b/c/stats
#ignore = Name *stats   ## ignores all files/directories that end with "stats"
#ignore = Name stats*   ## ignores all files/directories that begin with "stats"
#ignore = Name *.tmp    ## ignores all files with the extension .tmp
ignore = Name sess_*
ignore = Name *access.log*
ignore = Name error.log
ignore = Name webalizer.conf

#          When set to true, this flag causes the user interface to skip
#          asking for confirmations on non-conflicting changes. (More
#          precisely, when the user interface is done setting the
#          propagation direction for one entry and is about to move to the
#          next, it will skip over all non-conflicting entries and go
#          directly to the next conflict.)
auto=true

#          When this is set to true, the user interface will ask no
#          questions at all. Non-conflicting changes will be propagated;
#          conflicts will be skipped.
batch=true

#          !When this is set to true, Unison will request an extra
#          confirmation if it appears that the entire replica has been
#          deleted, before propagating the change. If the batch flag is
#          also set, synchronization will be aborted. When the path
#          preference is used, the same confirmation will be requested for
#          top-level paths. (At the moment, this flag only affects the
#          text user interface.) See also the mountpoint preference.
confirmbigdel=true

#          When this preference is set to true, Unison will use the
#          modification time and length of a file as a `pseudo inode
#          number' when scanning replicas for updates, instead of reading
#          the full contents of every file. Under Windows, this may cause
#          Unison to miss propagating an update if the modification time
#          and length of the file are both unchanged by the update.
#          However, Unison will never overwrite such an update with a
#          change from the other replica, since it always does a safe
#          check for updates just before propagating a change. Thus, it is
#          reasonable to use this switch under Windows most of the time
#          and occasionally run Unison once with fastcheck set to false,
#          if you are worried that Unison may have overlooked an update.
#          The default value of the preference is auto, which causes
#          Unison to use fast checking on Unix replicas (where it is safe)
#          and slow checking on Windows replicas. For backward
#          compatibility, yes, no, and default can be used in place of
#          true, false, and auto. See the section "Fast Checking" for more
#          information.
fastcheck=true

#          When this flag is set to true, the group attributes of the
#          files are synchronized. Whether the group names or the group
#          identifiers are synchronizeddepends on the preference numerids.
group=true

#          When this flag is set to true, the owner attributes of the
#          files are synchronized. Whether the owner names or the owner
#          identifiers are synchronizeddepends on the preference
#          extttnumerids.
owner=true

#          Including the preference -prefer root causes Unison always to
#          resolve conflicts in favor of root, rather than asking for
#          guidance from the user. (The syntax of root is the same as for
#          the root preference, plus the special values newer and older.)
#          This preference is overridden by the preferpartial preference.
#          This preference should be used only if you are sure you know
#          what you are doing!
prefer=newer

#          When this preference is set to true, the textual user interface
#          will print nothing at all, except in the case of errors.
#          Setting silent to true automatically sets the batch preference
#          to true.
silent=true

#          When this flag is set to true, file modification times (but not
#          directory modtimes) are propagated.
times=false

#          When this flag is set, Unison will log all changes to the filesystems on a file.
log=false

#          When this flag is set to true, groups and users are synchronized numerically, rather than by name.
#          The special uid 0 and the special group 0 are never mapped via user/group names even if this
#          preference is not set.
numericids=true
per testare la configurazione ed effettuare la prima sincronizzazione eseguire:
unison web
Per automatizzare la sincronizzazione andiamo a creare il cronjob sul server Master:
crontab -e
Ed inserire:
# unison

*  * * * *  unison web > /dev/null
salvare per attivare le modifiche.
8. Sincronizzare le Email con Dovecot
Dalla versione 2 di Dovecot è possibile usare Dovecot dsync per mantenere la base principale sincronizzata se avete gli stessi account e-mail sia sul server Master e lo Slave, replicando tutto sul server Slave in automatico.
Nota: Dovrete settare la stessa porta (4711) e la stessa password (replication_password) su entrambi i server.
Sul server Master:
Aprire /etc/dovecot/dovecot-sql.conf:
nano /etc/dovecot/dovecot-sql.conf
e verificare che sia attiva la direttiva iterate_query:
iterate_query = SELECT email as user FROM mail_user
Nel caso fosse disattivata abilitarla cancellando #.
Aprire /etc/dovecot/dovecot.conf:
nano /etc/dovecot/dovecot.conf
Aggiungere il seguente contenuto:
# Enable the replication plugin globally
mail_plugins = $mail_plugins notify replication quota

# Both the client and the server need to have a shared secret
doveadm_password = replication_password

# configure how many dsyncs can be run in parallel (10 by default)
replication_max_conns = 10

service aggregator {
        fifo_listener replication-notify-fifo {
                user = vmail
                mode = 0666
        }

        unix_listener replication-notify {
                user = vmail
                mode = 0666
        }
}

service replicator {
        unix_listener replicator-doveadm {
                mode = 0666
        }
}

service doveadm {
        user = vmail
        inet_listener {
                port = 4711
        }
}

service config {
        unix_listener config {
                user = vmail
        }
}

# use tcp:ip as the dsync target
plugin {
        replication_full_sync_interval = 1 hours
        mail_replica = tcp:192.168.0.2:4711
}

protocol imap {
        mail_plugins = quota imap_quota notify replication
}
Riavviare il servizio Dovecot:
service dovecot restart
Sul server Slave:
Aprire /etc/dovecot/dovecot-sql.conf:
nano /etc/dovecot/dovecot-sql.conf
e verificare che sia attiva la direttiva iterate_query:
iterate_query = SELECT email as user FROM mail_user
Nel caso fosse disattivata abilitarla cancellando #.
Aprire /etc/dovecot/dovecot.conf:
nano /etc/dovecot/dovecot.conf
Aggiungere il seguente contenuto:
# Enable the replication plugin globally
mail_plugins = $mail_plugins notify replication quota

# Both the client and the server need to have a shared secret
doveadm_password = replication_password

# configure how many dsyncs can be run in parallel (10 by default)
replication_max_conns = 10

service aggregator {
        fifo_listener replication-notify-fifo {
                user = vmail
                mode = 0666
        }

        unix_listener replication-notify {
                user = vmail
                mode = 0666
        }
}

service replicator {
        unix_listener replicator-doveadm {
                mode = 0666
        }
}

service doveadm {
        user = vmail
        inet_listener {
                port = 4711
        }
}

service config {
        unix_listener config {
                user = vmail
        }
}

# use tcp:ip as the dsync target
plugin {
        replication_full_sync_interval = 1 hours
        mail_replica = tcp:192.168.0.1:4711
}

protocol imap {
        mail_plugins = quota imap_quota notify replication
}
Riavviare il servizio Dovecot:
service dovecot restart
Verificare la replicazione su entrambi i server:
doveadm replicator status '*'
username                                                                                priority fast sync full sync failed
user@esempio.com                                                                     none     00:16:34  00:16:40  -
9. Settare il Firewall
Se avete attivato il firewall sui due server assicuratevi che siano aperte le porte 3306 per MySQL, la 22 per l’SSH e la 4711 per Dovecot su entrambi i server.
Note e Riferimenti
Guida estrapolata e tradotta dalla seguente: Installing a Web, Email & MySQL Database Cluster on Debian 8.4 Jessie with ISPConfig 3.1.
Siti di riferimento di ISPConfig:
Sito: http://www.ispconfig.org/
Forum: http://www.howtoforge.com/forums/
Bugtracker: http://bugtracker.ispconfig.org/